Create a New Mission
________________________________________________________________________________________
NAVIGATION
________________________________________________________________________________________
New Mission Builder
CONTENTS
What is a mission?
All GoSpotCheck (MarketX) functionality centers around missions. Missions are the medium through which your team collects field data. Unlike a traditional survey tool, missions are a grouping of various assignments, known as tasks, that were designed with field teams in mind.
This article will cover everything you need to know about creating a new mission.
Create a mission
To create a new GoSpotCheck (MarketX) mission:
- Navigate to the Missions tab in the web dashboard and select New Mission.
-
Provide a title for your mission in the Mission name box. Keep in mind that the name will be visible to users in the field and should accurately describe the contents of the mission. This name can be edited prior to publishing the mission.
- If needed, provide a description in the Instructions (optional) box to help users understand their objective. Instructions can be edited prior to publishing the mission.
- Click Save
Build a mission
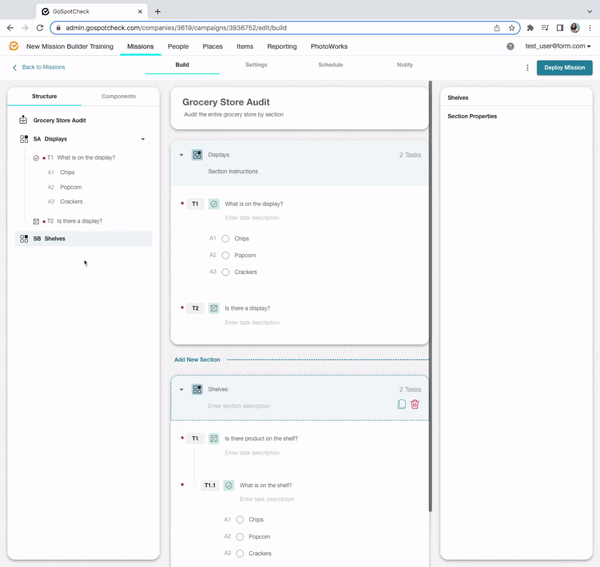
After creating a mission, you will be taken to the mission’s Build tab.
This is the canvas on which to create and configure your new mission. There are four navigation panels on the Build tab: Components, Structure, General, and Revisions.
Components:
Mission components are the building blocks of a mission. Tasks and sections are both listed in the Components panel. To begin building a mission, simply add components from the panel onto the mission builder canvas. There are three ways to add components:
- Click Add Component on a blank mission builder canvas.
- Drag and drop a component from the left-hand navigation panel onto the canvas.
- Click the + sign that appears above and below any existing task.
- Collapse the side panels to create more space on your canvas
Read more on the individual task types available in the components panel here.
Read more on sections here.
Structure:
The Structure panel displays the order in which tasks and sections appear within your mission. Mission components can be rearranged within this panel. There are three ways to reconfigure components in the Structure panel:
-
-
Reorder tasks: Drag and drop a task above or below another task to change its order.
-
Add/edit conditional relationships: When you hover over a task in the Structure panel, a perimeter appears around each individual task. To make a task conditional on another task, simply drag the desired conditional task into an existing task’s perimeter. Likewise, a conditional task can be rearranged into a standalone task by dragging the task out of its parent task’s perimeter and into its own row. Read more on conditional tasks here.
-
Reorder sections: To change the order of sections in the Structure panel, simply drag the section name to your desired location.
-
Undo Task and Section Rearrangement (Coming Soon): You can undo task and section rearrangements (individual and bulk). The undo action will only work in the structure panel, not any actions taken in the main section of the Mission Builder. It does not cover adding new or removing tasks and sections.
-
Reorder tasks: Drag and drop a task above or below another task to change its order.


Tasks can also be reordered, copied, deleted, and configured in bulk. Read more about bulk task actions here.
General:
The General panel contains mission distribution assignments. You will be required to assign at least one team and place group to the mission before it can be deployed. A team is a group of users that will be able to access the mission. A place group is a group of places/accounts where the mission will be available. The General panel opens by default when creating a new mission and can also be assessed by clicking on the mission title within the mission builder.
Revisions:
Missions can be edited and revised as necessary. The Revisions panel displays each revision, including when the edit took place and if an edit is currently in progress. Each revision listed in the panel links to an overview of that version of the mission, allowing admins to review what changed and how mission responses compare between versions.
Read more on mission revisions here.
Mission settings
Before deploying a mission, review the mission settings on the Settings tab. Missions have four available settings:
- Enable user assigned places: This setting ensures users can only submit mission responses at places they have been assigned. Admins must assign places to users in advance of mission deployment, otherwise, no one will receive the mission.
- Allow users to add places: This setting allows users to add new places on the fly from the mobile device. These places will appear in your full account list on the Places tab and in a designated place group named ‘New Places’.
- Allow missions without a place: This setting gives the user the ability to submit a mission response without any association to a place. This is also known as an Anywhere mission.
- Enable Copy & Start Mission Responses: This setting allows users to copy a previously submitted mission response, retaining the answers from the original response. This can save a user time if most of their responses remain the same between place visits. This functionality excludes photo and signature task responses.
If you do not have these options in your mission settings tab, please go to your Company settings page and make updates as needed.
Schedule a mission
The Schedule tab allows admins to dictate when and for how long a mission is available. There are three scheduling options:
-
Start this mission determines when a mission becomes available for users to submit responses. It can be set to Immediately or On a later date. If scheduled on a later date, the mission will automatically begin at 12:01 am (in your company timezone) on the start date specified.
-
Select a schedule type dictates whether or not the mission is available anytime or on a designated recurring schedule. To set a schedule, click Recurring and customize the mission schedule as needed.
-
Stop this mission controls when a mission will no longer be available to users. This can be set to Manually, indicating an admin must manually stop the mission. It can also be set to On, wherein an admin can prescribe a specific date on which the mission will automatically stop.
The Schedule tab also includes the ability to configure mission response limits. This will prevent users from submitting any additional responses to the mission once their prescribed limit has been met. Limits can be set by the total number of mission responses submitted at a place or by the total number of mission responses submitted by a user.
Read more on scheduling a mission here.
Mission notifications
The Settings tab allows push notifications to be turned on or off for a mission. If the Mobile notifications toggle is switched on, users will receive notifications on their mobile device that indicate when the mission is started, ending soon, stopped, or if the user has a mission response that is about to expire.
Learn more about mission notifications here.
Deploy a mission
After building and configuring your mission, click the Deploy Mission button in the top right-hand corner of the mission builder. If your mission is incomplete or missing the required information, you will receive error notifications that the mission cannot be started until the issues are resolved.
Once your mission is deployed, it will become available to users on the assigned team. You can make edits to the mission by creating a revision. Read more on editing a live mission here.
Stop a mission
To stop a mission that has been deployed:
-
Navigate to the Missions tab and click X Stop on any started mission.
- OR navigate to a mission’s overview page and click Stop Mission in the upper right-hand corner.
Missions can be set to stop automatically on a specified date by using a mission schedule.
________________________________________________________________________________________