Filtering Mission Response Data
________________________________________________________________________________________
NAVIGATION
________________________________________________________________________________________
New Mission Builder
CONTENTS
Filter overview
Filters allow managers and admins to view mission response data by certain criteria. For missions with numerous responses, this helps teams quickly identify key information.
To filter mission response data, click on any mission with responses in the Started or Stopped folders of the Missions tab.
The Overview, Mission Responses, People, and Places tabs all provide the ability to filter by a date range or to create a custom filter based on certain criteria.
Filter by date range
A date range filter ensures the resulting data includes mission responses submitted within the specified time frame.
To filter by date range, select Date Range on a mission’s Overview, Mission Responses, People, or Places tab. Mission responses can be filtered by the Last 7 Days, Last 30 Days, Last Month, This Month, All Time, or a Custom Range.
Filter by object
You can also create a filter that will narrow down mission response data by Place, Place Group, Task, Team, User, or Advanced.
- Place: displays mission responses from a particular place, city, state, or postal code
- Place Group: displays mission responses submitted at any place within a selected place group
- Task: displays mission responses which contain a specific response to a particular task
- Team: displays mission responses submitted by any user on a specific team
- User: displays mission responses submitted by a specific user
-
Advanced: displays mission responses that meet more complex criteria
- Example: Display only the most recent mission response at a location
To filter by object:
- Click the New Filter button on a mission’s Overview, Mission Responses, People, or Places tab.
- Click Add Criteria and select an option from the dropdown.
- If needed, add multiple filter conditions and select whether Any or All of the specified filters need to be met. Any will populate mission responses that meet any of the multiple filter criteria. All will only populate mission responses that meet each individual filter condition specified.
- Click Apply to apply the filter criteria or Save to save the filter for future use. Saved filters can be selected at any time from the filter dropdown.
Create filter alerts
After saving a new filter, a pop-up will appear with an option to Email an alert when responses match this filter. Check this box if you would like to receive email alerts based on the established filter criteria.
Saved filters with email alerts also appear in the filters dropdown, making it easy to filter by an existing alert.
Read more on alerts here.
Delete filters
To delete a saved filter, select the filter from the dropdown list and click Edit Filter. Click Delete Filter at the bottom of the filter settings.
________________________________________________________________________________________
Legacy Mission Builder
You can filter by:
- Place: displays mission responses from a particular place, city, state, or postal code
- Place Group: displays mission responses submitted at any place within a selected Place Group
- Task: displays mission responses which contain a specific response to a particular task
- Team: displays mission responses submitted by any user on a specific team
- User: displays mission responses submitted by a specific user
-
Advanced: displays mission responses meeting some advanced criteria.
Example: Display only the most recent mission response at a location - Date Range: displays missions responses submitted within a specified date range. You'll notice that the Date Range filter is broken out from the other filters (see below). However, unless a date range is specified, all data will appear. For larger scale data, you can request that we turn on pre-filter option that ensures only Mission Responses from the past 7 days appear. Talk to your CSM to enable this option.
Filter by Date Range
Create a New Filter

-
To add Filters, start in the Mission Overview tab and click the +New Filter button.
- From the Pick Criteria dropdown, select the criteria you’d like to filter by. Depending on what you choose, more options will appear. Fill in the fields as needed.
Optional: click +Add Criteria to add more variables.
Example: below we are filtering by Denver or Boulder.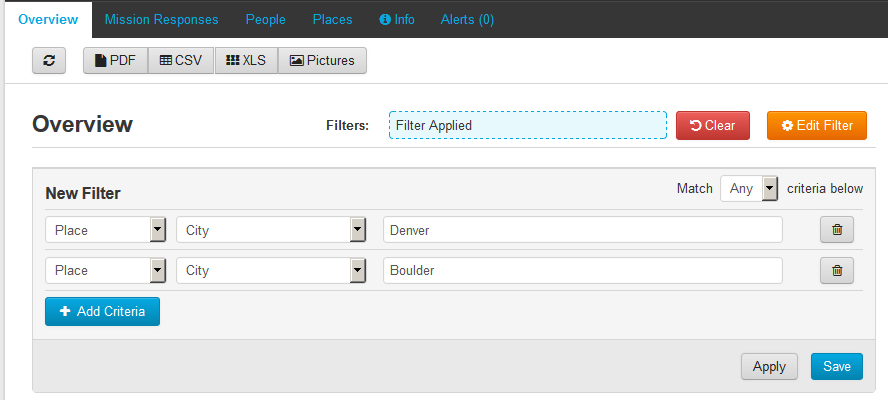
- Select "Any" or "All" in the match dropdown menu
- Selecting Any in the above example will find responses where the city is Denver or Boulder.
- Selecting All means that both criteria must be met. Example: where the city is Denver and the user is Ben
- When you have selected all the criteria, click Apply to see the results. To save the filter for future use, click Save. You’ll be prompted to name the filter.
Delete Filters
You can delete a Filter by selecting a saved Filter from the Filters dropdown and, after it loads, selecting the “Delete Filter” button.
If the Filter is also an Alert, when you delete the Filter, you will also delete the Alert. If you click on “Delete Filter” button for a Filter that is associated to an alert, you will see a pop-up asking if you want to delete both or cancel. If you cancel, no changes are made, and both your Filter and Alert will still be active.
Alerts for Filters
If you'd like to be alerted when a new mission response is submitted which matches a saved filter, you can setup email alerts. For more information about setting alerts based on filter criteria, see the Help Center article Creating and Managing Alerts.
If you created an Alert, it automatically created a Filter, too. You can see which Filters are associated to an Alert by selecting the Filter dropdown. Anything under “Filter by Alert” is also an Alert.